71 Chevy Camaro Front & Rear Subframe Installation
Article provided by Heidts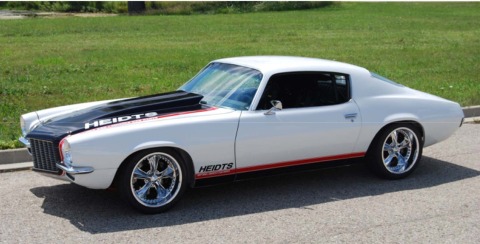
by HEIDTS Hot Rod & Muscle Car Parts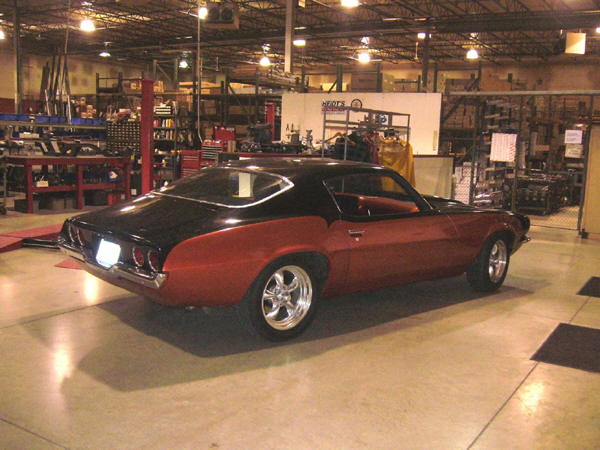
The beginning… 1971 Camaro in serious need of help
The teardown begins with removal of the front clip

Careful don’t scratch the paint

Front clip removed as an assembly

The old 350, soon to be replaced with a ZZ383 crate motor

Engine and trans removed

The stock subframe is in remarkably good shape

Removing the 4 bolts that hold the old subframe to the body

Brake lines need to be disconnected before separating the subframe from the body

Subframe bolts removed, rolling out the old

Old out, making room for the new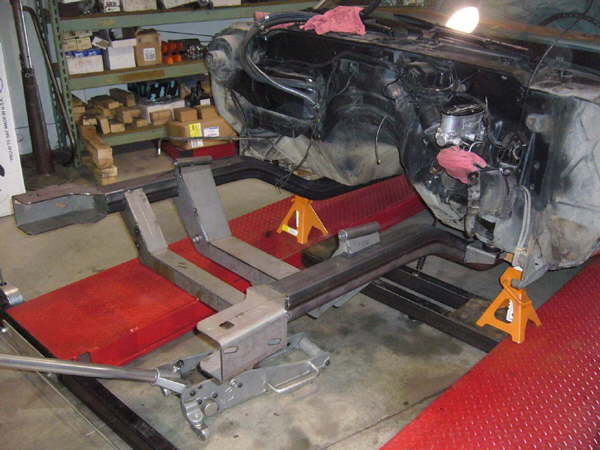
The prototype 2nd gen subframe is mocked into place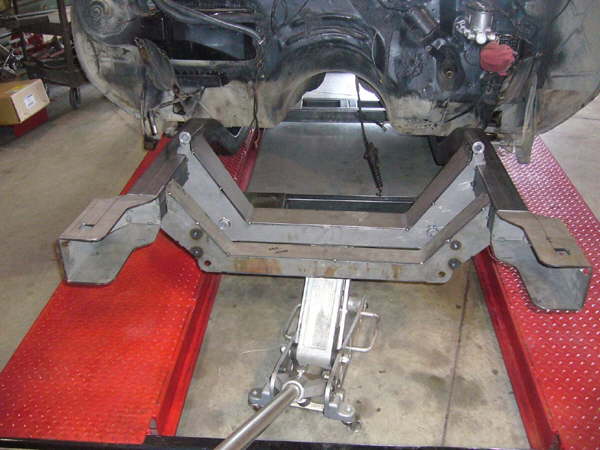
Prototype Subframe supported

Installation of new urethane subframe to body mounts

Body is ready for delivery to the body shop for body and paint work

Transport by flatbed the only way to go

The new arrival at the body shop

The newly powder coated subframe is bolted in the freshly painted body

Reinstalling the urethane body mounts, urethane offers a better life span then rubber mounts
")
Lower control arms are mounted in double shear brackets – (both front and rear)

Upper control arms are installed, arms are fully adjustable for caster & camber and have bolt in replaceable ball joints

Coilovers are utilized for light weight, adjustability, and performance. Mounting is done with the T-Bar style.

2″ dropped spindles are used to yield a low stance to improve handling and performance.

Control arms, spindles, coilover shock installed passenger side.

Control arms, spindles, coilover shock installed driver side.

A 1″ swaybar is bolted into place, a 1-1/4 bar is available.

Shocks are secured to the lower control arm.

A power rack & pinion steering is installed (standard on our PRO-G subframes)
")
Steering arms are a bolt on instullation (notice the loctite on the bolts to secure them into place)

Bolts are tightened and then torqued

Loctite is used on all critical hardware to insure trouble free operation

The rod ends are installed and connected to the spindles. Sway bar is bolted into place.

GM Performance ZZ383 crate motor is set into place and checked for angle.

The ZZ383 is bolted into the subframe on the welded on motor mount stands

Bolt on accessories and headers are installed

13″ Wilwood rotors and 6 piston calipers provide stopping power up front.

4-Link brackets bolt in using some existing holes and some drilled holes

Reinforcing plates & spacers are included in the 4-Link kit.

Heidts bolt in 4-link rear provides easy installation & performance to match the front PRO-G Subframe
")
With the crossmember and brackets mounted awaiting the rear (upper crossmember has brackets installed for swaybar mounting)

The Ford 9″ rear housing and adjustable coilovers are installed

Adjustable coilovers are used to tuneability & performance

Adjustable upper & lower link bars allow fine tuning of axle location & pinion angle for maximum performnace

Super clean & functional installation

Axles & Wilwood rear disc brakes with parking brake installed

Optional 9″ Ford rear housing with brackets installed helps speed installation

Optional subframe connectors, transmission, crossmember, drive shaft hoop bolted into place.
")
As with the front, 13″ rear discs with 4 piston calipers provide plenty of stopping power (6 Piston optional)

Major body structure is done, waiting for some finishing touches

Finishing plumbing and getting ready to fire the new engine.

Heidts power steering valve installed to allow a better road feel.

Steering feel is adjusted with the turn of a valve.

A Wilwood aluminum master cylinder with dual booster & adjustable proportioning valve provides plenty of pressure for the calipers.

Suspension adjusted and ready to hit the road with Nitto NT01 tires all around.

This is the view the road will see, but at a much faster speed.

On the road and ready to run.